I learned a number of neat HTML/CSS tricks at this weekend’s Access Code application workshop. During the presentation, we were encouraged to advance our knowledge by checking out the source code behind some of the interesting HTML elements that we encounter across the web. With that goal in mind, I was intrigued into figuring out the inner workings of w3schools.com’s cool, interactive hexagonal hexadecimal HTML Color Picker:
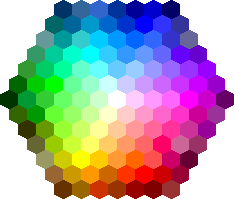
On w3schools.com’s site, this colorful image serves as an interactive map to help web designers identify a color’s corresponding hex code. As you mouse-over each individual colored ‘cell’, a box below the hexagon displays the color along with its code. When you click on a cell, the hex code appears in a text box where it can be easily selected and copied. When I inspected the page’s source with Chrome, I was surprised to find that the entire Color Picker hexagon is a single .gif image.
I knew that images could be used as links, but I had no idea that a single image could be broken up into several seemingly-independent clickable regions using just HTML. This unfamiliar snippet of code gave me a clue into how it’s done:
<map id="colormap" name="colormap" onmouseout="mouseOutMap()">
         <area style="cursor:pointer" shape="poly" coords="63,0,72,4,72,15,63,19,54,15,54,4"  ...
I had never seen <map> or <area> tags before, so I googled them to get more info. It turns out that these tags are the key to creating HTML “image-maps”. Image-maps are just images with clickable areas.
To create an image-map, the first step is to include a picture on your webpage using the <img> tag. Along with a src= attribute, also include a usemap= attribute, and begin its corresponding value name with a hash (#). Your complete tag should look something like this:
<img src="image.jpg" usemap="#mapofthings">Below your <img> tag, create a <map> tag. You should include the attribute name=, and set it equal to the value of usemap (no need to include the #). Also, remember to follow it with a closing tag. For example: <map name=“mapofthings”>. Nested inside the <map> tag you’ll put <area> tags (one for every clickable region of the image):
<img src="image.jpg" usemap="#mapofthings">
       <map name="mapofthings">
         <area>
         <area>
         <area>
       </map>
Now, to define our clickable regions, we’ll add these magical attributes to each
- shape=
- coords=
- href=
The shape= attribute specifies the shape of an area’s clickable region: ”rect", ”circle", or ”poly". The positions of these shapes are defined by coords=: for a rectangle as ”x1, y1, x2, y2", where the top-left corner of the rectangle is (x1,y1) and the bottom-left corner is (x2,y2), or a circle as ”center-x, center-y, radius". The value ”poly" can be used to create many-sided or irregular shapes by specifying as many corner coordinate-pairs as you’d like. The href= attribute, as we know, specifies the targeted link.
With a picture of some objects from around my room, I used a photo editing program to measure the rough pixel coordinates of each object and plugged those numbers into our image-map code. So here it is, all together now:

(Click on the objects in the picture to learn more about them!)
And the code:
<img src="http://i59.tinypic.com/1zgvr5h.jpg" usemap="#roomthings">
 <map name="roomthings">
    <area shape="rect" coords="0,0,300,150" href="motorcycle.html">
    <area shape="rect" coords="0,150,300,448" href="pineapple.html">
    <area shape="rect" coords="300,250,600,448" href="spoon.html">
    <area shape="rect" coords="300,0,450,125" href="samsung.html">
    <area shape="rect" coords="450,0,600,125" href="token.html">
    <area shape="rect" coords="300,125,450,250" href="key.html">
    <area shape="rect" coords="450,125,600,250" href="balm.html">
  </map>
Of course, w3schools.com’s Color Picker uses JavaScript to fancy things up a bit, allowing events to happen seamlessly on the page rather than linking out. I’m especially curious to figure out how the “Darker/light shades:” selection area is generated. Still, even the basic HTML image-map is pretty cool. I’m looking forward to experimenting with what I’ve learned for some fun and unusual web designs.